
Martha Stewart’s No Bake Cheesecake is a dreamy, creamy dessert that melds sweet and tangy flavors in a perfectly smooth filling. With a crust that evokes the comforting crunch of shortbread and a light, airy cheesecake that sets up happily without an oven, this recipe is ideal for warmer weather gatherings. It comes together in about 20 minutes, followed by a chill time, and the key is in allowing the cream cheese to soften properly for smooth mixing.
This recipe is perfect for anyone looking to impress guests without the hassle of baking. It’s great for summer parties, family gatherings, or a cozy night in. The cheesecake can be made ahead of time, so you can store it in the fridge until you’re ready to serve.
Why You’ll Love This Recipe
- The no-bake method keeps the cheesecake light and creamy.
- The shortbread crust adds a delightful crunch and buttery flavor.
- Fresh lemon juice brightens the filling, making each bite refreshing.
- It’s an easy, make-ahead dessert that saves time on special occasions.
What You’ll Need
Here’s everything you need to create this delicious cheesecake:
For the Crust
- 1 ¾ cups shortbread crumbs (I used frozen ones from January, barely thawed)
- 6 tbsp unsalted butter, melted (the good kind, or the kind you forgot was good)
- pinch of flaky sea salt (mine’s from Provincetown)
For the Filling
- 2 (8 oz) packages cream cheese (left on the counter while I got distracted)
- 1 (14 oz) can sweetened condensed milk (syrupy, churchy, somehow tender)
- juice of 2 lemons (more than Martha said; I needed it)
- 1 ½ tsp vanilla extract (Christmas; every time)
Use full-fat cream cheese for the best taste.
Substitutions & Swaps
- Use graham cracker crumbs instead of shortbread.
- Swap fresh lemon juice for bottled if needed.
- Substitute dairy-free cream cheese for a vegan option.
- Use maple syrup in place of sweetened condensed milk for a lighter version.
How to Make It
Creating this cheesecake is straightforward and rewarding.
Make the crust
Crush the shortbread in a freezer bag with a rolling pin I only half-trust. Add melted butter and a pinch of sea salt. It smelled like old toast and something sweet. Mix until it clumps like sand at low tide. Press into the springform—bottom and halfway up the sides. Not perfect. Just enough. Chill it in the freezer while the filling comes together.
Soften and beat
Let the cream cheese sit too long—on purpose. It slouched into the bowl like it knew it was going to be whipped. Beat it with the hand mixer I melted the cord on last winter. Add the condensed milk slowly. Stop to taste. Add more. Keep going.
{image_1}
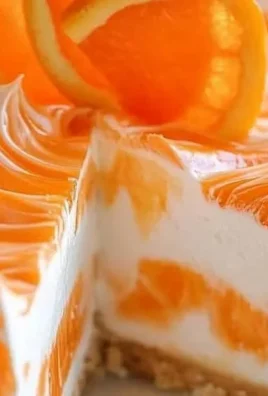
Add the lemon and vanilla
Pour in the lemon juice with no hesitation. Zest still on my hands. Stir. Add vanilla. It hit like memory. Everything quiet for a second.
Fill and chill
Scrape the filling into the crust. Smooth it with the back of a spoon, the one with the burn mark. Cover with plastic wrap that wouldn’t stick. Refrigerate. Wait. Open the fridge too early—twice.
Serve cold
Unclasp the pan, slow and breath-held. Knife through like silk. Mae ate hers standing. I didn’t sit either.
How to Store It
Fridge: up to 5 days in an airtight container.
Freezer: no, it alters the texture.
Reheat: not needed; serve cold.
Tips for Best Results
- Make sure the cream cheese is fully softened for an ultra-smooth filling.
- Press the crust firmly for the best texture and structure.
- Allow the cheesecake to chill for at least 4 hours for optimal flavor development.
- Use a hot knife to slice for clean edges and presentation.
Serving Suggestions
- Serve alongside fresh berries for a pop of color and flavor.
- Top with chocolate drizzle for a decadent twist.
- Pair with whipped cream for an extra creamy bite.
{image_template}
Leave a Comment